Friday, December 30, 2011

Santa's Spreadsheet


I have hated Excel for as long as I can remember, 
going way back to my days as a Secretary.
Excel and Panythose....straight to hell as far as I'm concerned.

This year, I have become one with the Spreadsheet; well, 
at least, there is a mutual acceptance.

I am a gigantor To~Do*Lister.
My To~Do Lists have To~Do Lists...
and some of them have a To~Do List..
OY~it's just too much Man!

So I told my Self...Self, check out this spreadsheet thing.
And I did.
And I LoVeD it!


Not only did I list each person and their intended gifts,
but at the bottom of the list,
I placed all the Stores that I needed
to peruse for said Gift.
Righteous!

That seemed to make such a difference.
I'm a hooked spreadsheet Holiday hOoker now...
one brightly colored marker, Sharpie if you please!, 
and Santa just got a Ho Ho {w}Hole Lot better~

Organizing for Yulemas Notions, Potions, & GLiTTeR....Sooo much GLiTTeR

 Easy....
  
I want to do a huge wall calendar.
With moveable parts that have moveable parts.
Where I can glaringly see
what I have done, and need to do.
Needing usually outweighs the Done.
I want the Willy Wonka of Calendars, all whymsical and stuff.
But non complicated.
things that make you go hmmmm.....

I was thinking about sheet protectors.


and hooks
{hooks for hookers}


and tags,
tags with things to do on them.

all switcharooney and stuff.


Office Depot, here I come...

Thursday, December 22, 2011

Finger Paints Laugh My Art Off nail polish


 I've been feeling Blue this Yulemas...
shades of Blue that is.

                             I've always loved 
looking up at the night sky 
on Christmas EvE, 
and yes,
I still look for Santa.
It's the Magic, right?

This polish is Magical. 
It's a nice break 
from the Reds and Greens 
of the Holidays.


It's my North Pole, at Midnight, clear and crisp...
it's GLiMMeR~licious.

It is a heavily GLiTTeRed polish,
which makes it thick.
A nice clear top coat 
would be beautiful
and luscious.
My nails have 2 coats without top coat.

I could see a White party dress
with this Blue polish for a 
rockin Yulemas celebratory.
C'mon, who hasn't designed a Celebratory
around a lipstick or polish?


That's happiness all around folks

Wednesday, December 21, 2011

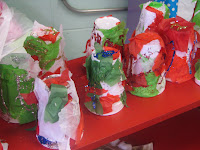
Styrofoam and PiPe Cleaner Bells.....

 
 I LOVE KINDERGARTEN!

 Party time in the fun house.


The K`kids were Super excited to find out
that with their Holiday party, they were
going to do an Art Project~

Styrofoam and PiPe Cleaner BeLLs....
WITH GLiTTeR!


We had the Kinder's tear pieces of Tissue PaPer up,
   and then glue them the Styrofoam Cup. 
If you do use GLiTTeR like we did, 
have the Kinder's decorate the cups with GLiTTeR
after placing the Tissue PaPer on. 
You want to give the glue some time to dry
before doing the next step.


While we waited for the cups to dry, we had the kids attach their BeLLs to the PiPe Cleaners. Slide the PiPe Cleaners through the loop on the BeLL and have them twist it.

You want a few inches twistability for two reasons:
1. To have enough to secure the BeLLs tightly
2. The Twist will be your anchor to keep the cup on 
   and still allow the BeLL to jingle.


Using a Pencil {hey teacher, I forgotmy Peeeencil!} 
punch a hole in the top of the cup to push the
PiPe Cleaner BeLL through, and Shazam! 
You've got a Styrofoam and Pipe Cleaner Bell!

Bring on the Ringers....

Monday, December 19, 2011

Bayou Book Eater Up~per

Our School Librarian has seen a project that she really liked,
and asked if I could do one for the Library.
It was a book deposit that looked like a mouth, that would eat the books.
Yep, sure, No Problem.

I was able to complete it in two days.
I ended up using a sheet of Cabinet Plywood. 
It was smoother, cleaner, 
and didn't have that awful smell
that a lot of plywood seems to have these days.

The first day was spent on cutting...
measure, measure, and then measure again.
I used a circle saw but a table saw
would have been so much easier and smoother.
A jigsaw was used to cut out the mouth.
Lightly sand the edges of the outside and the mouth.

I spent the whole day Monday, doing the art work.
At first I was going to use my Tempra paint but instinct told me 
to do a little googling to see if it would work.
Just as I thought, Tempra will most likely flake off. 
So to be on the safe side, I went with my Acrylics.
I gessoed/ primed the board and let dry. 
It does tend to dry rather quickly, which is good.
Sketched out the design and started painting.
  I didn't stop til it was done!
I brought it to school the next day,
and Lady Librarian was oh so happy.
One of the Dads did a great job of attaching the board
all neatly and lovely to the desk.
This way it can be changed out or moved easily and with little damage to the desk.

The Kiddos have really been enjoying it
and what better compliment can you get???


Friday, December 16, 2011

Thursday, December 15, 2011

Embroidery Felt Bird ornament


This project comes from the same art magazine
as the bread dough snowflakes.
My  level of my embroidery was pretty weak,
But I wanted it so I did it....


Trace the pattern on to your felt 
{you could easily substitute
any fabric i would imagine}
Follow the stitching instructions for the embroidery.
Now, the only thing I know about embroidery
is how to thread the needle.
Oy!


I eventually finished the stitching,
 then cut the pieces out along the outline.

I did not stuff mine..I tried, but it was not a pretty sight.

I used mine as a wreath ornament for the front door.
Using a large sprig from our Yulemas tree,
I attached the Felt Bird and hung up.
I really like this project
so plan on making more of these in the future.
Rainbow would be gorgeous.


 Instructions from Holiday Crafts 2010:

Tuesday, December 13, 2011

Vintage JeweLbrite AngeLs and BeLLs

I found these LoVeLies on Etsy.  
There are many reasons why I love these: 
*Childhood memories {mine is top left, that's Santa on the inside}
*They're Angels
and
*Plenty for each Kid to get one later on when they grow up.

Plus, I'm Bright & Shiny for anything in miniature~

I will be adding more pieces in the coming year.
It was Delightful to see so many different varieties.


MrFilthyRotten

Sunday, December 11, 2011

Annual NoLa Yulemas Tripp...cause it's a, family tradition

 Angeli's!!!
 Santa's Quarters

 Our FAVE~orite New Orleans Street Performer!

I FREAKIN LOVE NEW ORLEANS!

Saturday, December 10, 2011

December FuLL MoOn ~ Cold MoOn

  Winter came down to our home one night
Quietly pirouetting in on silvery-toed slippers of snow,
And we, we were children once again.
~Bill Morgan, Jr.


Pictures~Selfridge's Christmas Window Display 2011

Friday, December 9, 2011

GLiTTeR PineCones


Continuing with the Ornament Creations
We gathered up some pine cones
Brought them home and then
"baked" them in the oven on 225
for a couple of hours because
they were wet and needed to be dried out,
which opens them back up.


DO NOT amp up the oven temp to try and hurry up the process,
for you shall haveth burnt smoking pine cones....


 Supplies:
----------------
*Pine Cones
*Glue
*GLiTTeR
*PiPe Cleaners or other hanging material
{we used Sparkalicious PiPe Cleaners,
but CoLoRfuL Yarn would work really well, too}

Once they are dried and opened up sufficiently,
all that's left is to twist the pipe cleaner to the top,
dribble glue on all sides.
Dribble,
Don't Drobble,
or you'll have great big blobs of sporadic GLiTTeR.

Shake pine cone firmly, but gently to 
remove excess glitter.
Set up to let dry.
Once it's dry 
add randomly to your tree for 
some extra sparkly goodness in the Yulemas spirit.

{it's looking more and more like I need a new camera!}


Thursday, December 8, 2011

December ~ Sagitarrius the Archer

      "I won't eat any cereal 
that doesn't turn the milk PurPLe."
~ Bill Watterson 


Sagitarrius


Hush ~ Deep Purple


Elvis would be impressed with these Suede LoVeLies....


Chompa ChompChomp, hookers.
I'm a T~rex AND I'm Purple.
Double CooL.

Lagniappe: I'm also a planter! 


When you wish upon a Star...


 maybe it could be for this dress!
Wowza.


 PurPLe Suede Mary Janes ~ Bethlesvintage


 T~rex Planter ~ BloominHappy2009


 Star Bracelet ~ WaterHorseStudios


 PurPLe Houndstooth Dress ~ ArtAffect


Neon PurPLe Cow ~ LeLand Johnson

Tuesday, December 6, 2011

GLiTTeR Acorns


 Easy craft and lots of fun.
And they look GREAT on the Tree.

Acorns
Glue
GLiTTeR
PiPe Cleaners
Green Wire
Dremel/Drill


Gathering the Acorns is a great Family Do~gether!
The bigger your acorns the better.

Once you've collected your Acorns,
separate the cap from the acorn and
make sure they are clean and dry.

First decorate the Caps; they will need time to dry.
I used Elemers Glue and Silver GLiTTeR.
Spread liberally, not drowningly, the Glue on the cap.
GLiTTeRiZe! 

You can also GLiTTeR the Acorn and leave the Cap natural
{I can't find my pics of those!}

Using a small drill bit {I used my Dremel} drill hole in Cap to insert hanger.

For the hanger, Sparkalicious PiPe Cleaners really rock,
as does the Green Wire.
Using any needle nose, flat nose, etc. pliers
to crinkle the Wire adds a really great accent.

Secure hanger with some Glue.
Place enough Glue to adhere to the Acorn and reattach the Cap.

Using a bowl of rice, or sand/dirt, beans
is great for setting the acorns up while they set up and dry.

Once the GLiTTeRed Acorns are completely dry,
hang on Tree, 
or any other surface
and Enjoy.