Monday, January 31, 2011

ReVamp ~ a Side Table


This is a weekend project.
I hate to throw
a pretty fabric away.
Majority of the time,
I never end up doing 
anything with them.
I "inherited" this table
{ok, more like I laid claim
to it when we were dating.}


These small side tables just appeal to me.
I just couldn't think of anyway to craft it up.
Then, an Idea.
Hey you got chocolate in my peanut butter...
Hey you got peanut butter on my chocolate.

and I wanted a Sunburst pattern.
That was the only way I could think of to get a smoother fit, 
and to make the pattern interesting.

I took this old dress, and began de-dressing it. 
Using an X~acto Knife {WITH FRESH BLADE}
I began ripping all the seams out.


After ripping the main seam and opening the Dress, 
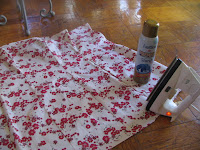
I did a quick starching to flatten it.
It made it a lot easier to rip the remaining seams.


Using a template cut from illustration board, I traced as many of the shapes onto the back of the fabric that would fit.

I had also lightly
sketched 
on the board top.
You can google a 
Sunburst pattern
to print 
if that helps. 
Once I had all 
my fabric strips cut,
I took the top
off the stand; 
cleaned the stand,
and began placement of the fabric.


Setting up on the floor is your best bet. It gives you the room you need with the ease of moving from one spot to the next. Using your template or a REALLy good eye, iron as small a seam as you can; I went approx. 1/4 inch. I starched the hell out of them too. Be aware of the type of fabric you are using. This makes a difference. It worked for this.


Do a placement test of the fabric 
before you start decoupaging. 
Once I was happy with the placement,
I started with the longest strip and 
decoupaged it. I went a little bit
heavier on the seams for a good fit.
Constantly and firmly using the brush
to smooth it down. Get your seams as
flush as you can. 
It was very meditative.


 I went back while it was drying 
to smooth any seams, re~glue any loose ends/seams,
and to smooth down any fabric that bubbled up.


When that was completely dry, I used a box type razor {FRESH}
to very carefully trim the fabric where needed.
A fresh sharp blade cuts the glue stiffened fabric nicely.


Again, do a once over to seal any loose ends.
I used a bowl to do a smooth edge for the Sun circle.
I liked my Sun off to the side.

I repeat the whole trim cutting and re~gluing
of the Sun circle edge. Cut my circle for the Sun,
Glued and trimmed it.


Once the fabric was completely dry, I painted the table edge with a soft, dark, metallic Copper acrylic paint.


While the tabletop was drying, 
I cleaned up the stand, 
and repainted it with 
Krylon's Cherry Red.
Sweeet!! color.

When it was all dried and done, 
I re~attached the pieces and here we are:


I at one point thought about pouring a layer of Resin
over the fabric, but decided against it for a few 
reasons:

* Not sure of the yellowing factor of the resin
*Not sure of the dye factor of the fabric
*What if I get tired of it? If it's resinated,
I can't rip the fabric off.

I'm looking for a nice piece 
of glass.

Saturday, January 29, 2011

Priscilla's Earthly Delights


I ♥ Lipstick.
Seriously.

I happened to spot these 
while in a bit of a funk
and they immediately made me feel cheery.
Brightened my day right up!

First, I thought, 
oooh, a new color for Spring, 
gotta find a dress to go with...


Second thought, screw Spring, it's perfect for now.


This lovely shade here is Maybelline's {160} FiFth Ave. Fuchsia.
It Rocks on all kinds of levels.
It's a full cream lipstick so the coverage is great.
The CoLor is Brilliant. 
I've always had a thing for in your face pink...
it puts on this air of innocence and then bam 
punches you in the face with its' boldness. 


The second lipstick is Covergirl {335} Embrace. 
Darker  purplish color , rocks just the same.
Creamy, decent coverage.

Great night out lipstick. 
{Priscilla says: Cocktails !}


I've tried many many colors,
but I always come back to the Pinks.
These highly colored, bold pinks and purples
are so Punk to me.
Reminiscent of my teenage 80s days.
{minus the ironed spiked hair which I did not sport, not for lack of trying} 

The perfect beauty to compliment my pink high~tops,
or my black~mayormaynotkickyourass~boots.

Friday, January 28, 2011

hmmmm....


yeah, I got nothing.

Wednesday, January 26, 2011

Simple Meals ~ Cream of Wheat


I must be the only person in the world who loves Cream of Wheat.
At least, in our house, I am.
With all this blistery cold Wynter we're having, it's a perfect meal.
Plus, it fills me up, so I'm not snacking all day while stuck inside.


I have found that HOW you make it makes all the difference in the world.
I had a friends in high school, a brother and sister, who's MoM
knew how to handle the Cream of wheat.


But it's so simple.
I use the milk option when cooking mine.
That makes all the difference.
Also, to constantly stir it while cooking.
Whisk it really.


1 1/4 cup milk {I used 1%}
3 tbls Cream of Wheat
Whisk

Butter
Sugar
Cinnamaon
splash of Milk

Heat the milk to just boiling,
and while pouring the Cream of Wheat in, whisk it.
It only takes 2 minutes to cook so I whisk the whole time.

Pour into bowl,
add to taste:
Sugar
Butter
Cinnamon
Splash of milk

Let set for a couple of minutes,
stir it all together,
Eat.

yumm.

Saturday, January 22, 2011

Sweet Jalapeno Pretty Mama, it's a GorGeouS Day!!

 
  Scenes from a Bike ride

Ja Sha Taan ~ Fun Da Mental

 Check out my mad bike~ridin~photo~tak'n skills, hOOkers!


Treats at Our Fave Java Joint


not for a Bike!


 "See how the Sacred Old Flamingoes come,
Painting with Shadow all the marble steps:
Aged and wise, they seek their wonted perches
Within the Temple, devious walking, made
To Wander by their melancholy Minds."
~William Butler Yeats
  Mardi Gras is here Biznitches!

Scenes from a Bike Ride musical
********************

Boogie Shoes ~ KC & The Sunshine Band
http://www.youtube.com/watch?v=Ux2WXNsqfe8


It Ain't Like That ~ Alice in Chains
http://www.youtube.com/watch?v=qx7NtmiayNA

Disco Duck ~ Rick Dees {NO SHIT! it's on my playlist}
http://www.youtube.com/watch?v=97RjuC9YeXg

You Can Talk To Me ~ Stevie Nicks
http://www.youtube.com/watch?v=9ZHJxP7EsNQ

Heart of Soul ~ The Cult
http://www.youtube.com/watch?v=PBP0c063ncA

Friday, January 21, 2011

Resinated Animal Cracker Ornaments

This is another one of those projects 
that I stumbled upon from back in the 80s.
Only that project was using
clear fingernail polish to coat the cookies.
Did NOT work!


But I've always loved the idea of this.
and it's easy.
looks good
and can make a great gift too.

Supplies
********
Animal crackers
Wire or pre~made hooks
Elmer's Glue
Resin
Wax paper
Wire cutter
Pliers
Wooden stick, I used a chopstick,
or other suitable object to make a hanging rack
Disposable spoon
Extra Wire for dipper hooks

I like the idea of making my own hooks.
I choose a burgundy/purplish wire.
20 gauge.
Cut a piece of wire, then use the
pliers/needle nose to shape it.
You can see I did a square for the
attached part; loop for the hanging part.


Using your chopstick or other object construct your hanging/drying rack.
I have a double clip "third hand" that I placed the chopstick on. 
Anything will work as long as you make sure the rod doesn't roll.
Place drying rack on wax paper {or other suitable stuff like foil or glass} for your drip.

After creating your hOOks, use the Elmer's glue to attach them.
Let glue dry completely. If it comes off, redo it.

Quickly make some S shaped dipper hooks
{the metal bit that is on the loop end}
Attach one to each loop.

Mix up your resin, Make sure its in a cup deep enough to dip the cookie crackers.

I used a bit of wire in the hook to dip the cookies in the resin. 
Have a disposable spoon handy to pour the resin around the hook 
and coat the cookie thoroughly. 
TRY NOT TO GET RESIN ON HOOK LOOP!
Then you'll be stuck with your dipper wire attached to you hanging hook. 
Let it runoff for a handful of seconds and place on hanging rack.
Let dry for a day or two, then lather, rinse, repeat.  
Twice more.

I triple coated these babies. 
So it can take up to a week to get these done. 
You want to make sure that they are
completely hardened and dried 
so they won't stick to anything. 
sometimes they do anyway.
If so, Let them out in the open for a bit
and they should harden back up.

I also wanted to see how they would look
with the Priscilla Effect.
GLiTTeRized.
I used this monkey as my guinea pig since I screwed up the hook.
Honestly, I'm not sure. I will have to play around some more with it.

When they are completely done, 
you should be able to carefully repackage them in their original box,
or maybe create something out of an egg carton.


Wednesday, January 19, 2011

January Full Moon ~ Wolf moOn

 "Anyone who has ever heard it 
when the land was covered with a blanket of snow 
and elusively lighted by shimmering moonlight, 
will never forget the strange, trembling wolf cry."
~ Unknown

Wolf Like Me ~ Tv on the Radio 


"The timber wolves will be our friends
We'll stay up late and howl,
At the moon, till nighttime ends,
Before going on the prowl"
~ Calvin, Calvin and Hobbes


"There are, of course, several things in Ontario
that are more dangerous than wolves.
For instance, the step-ladder."
~ J.W. Curran, The Canadian Wildlife Almanac, 1981


Wolf and I ~ Oh Land 


Moon Painting
http://www.laureenmahoney.com/pages/paintings/full_wolf_moon.html

Tuesday, January 18, 2011

Two SiSters Mary Thoughts for the Day ~ January


January brings the snow, 
makes our feet and fingers glow.
~ Sara Coleridge


Tuesday Afternoon ~ The mOOdy Blues


Winter's Child ~ painting

Dandelion painting ~

Unknown title ~ painting by Michael Parkes