Showing posts with label Kid~Do's. Show all posts

Saturday, September 1, 2012

CRaFts from Around the CoRner


Living in Mardi Gras country,
there is a never ending supply of 
CoLoRFuL plastic Beads.

With the HoHoHolidays around the corner,
these are perfect gifts, especially for the Womb Fruits
to make and give.

Adding handmade Soaps,
or 
small box of Incense
and some Tea Light candles
will make it even more special.

Even a key bowl
to set by the front door.


Wednesday, December 21, 2011

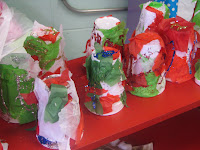
Styrofoam and PiPe Cleaner Bells.....

 
 I LOVE KINDERGARTEN!

 Party time in the fun house.


The K`kids were Super excited to find out
that with their Holiday party, they were
going to do an Art Project~

Styrofoam and PiPe Cleaner BeLLs....
WITH GLiTTeR!


We had the Kinder's tear pieces of Tissue PaPer up,
   and then glue them the Styrofoam Cup. 
If you do use GLiTTeR like we did, 
have the Kinder's decorate the cups with GLiTTeR
after placing the Tissue PaPer on. 
You want to give the glue some time to dry
before doing the next step.


While we waited for the cups to dry, we had the kids attach their BeLLs to the PiPe Cleaners. Slide the PiPe Cleaners through the loop on the BeLL and have them twist it.

You want a few inches twistability for two reasons:
1. To have enough to secure the BeLLs tightly
2. The Twist will be your anchor to keep the cup on 
   and still allow the BeLL to jingle.


Using a Pencil {hey teacher, I forgotmy Peeeencil!} 
punch a hole in the top of the cup to push the
PiPe Cleaner BeLL through, and Shazam! 
You've got a Styrofoam and Pipe Cleaner Bell!

Bring on the Ringers....

Friday, December 9, 2011

GLiTTeR PineCones


Continuing with the Ornament Creations
We gathered up some pine cones
Brought them home and then
"baked" them in the oven on 225
for a couple of hours because
they were wet and needed to be dried out,
which opens them back up.


DO NOT amp up the oven temp to try and hurry up the process,
for you shall haveth burnt smoking pine cones....


 Supplies:
----------------
*Pine Cones
*Glue
*GLiTTeR
*PiPe Cleaners or other hanging material
{we used Sparkalicious PiPe Cleaners,
but CoLoRfuL Yarn would work really well, too}

Once they are dried and opened up sufficiently,
all that's left is to twist the pipe cleaner to the top,
dribble glue on all sides.
Dribble,
Don't Drobble,
or you'll have great big blobs of sporadic GLiTTeR.

Shake pine cone firmly, but gently to 
remove excess glitter.
Set up to let dry.
Once it's dry 
add randomly to your tree for 
some extra sparkly goodness in the Yulemas spirit.

{it's looking more and more like I need a new camera!}


Tuesday, December 6, 2011

GLiTTeR Acorns


 Easy craft and lots of fun.
And they look GREAT on the Tree.

Acorns
Glue
GLiTTeR
PiPe Cleaners
Green Wire
Dremel/Drill


Gathering the Acorns is a great Family Do~gether!
The bigger your acorns the better.

Once you've collected your Acorns,
separate the cap from the acorn and
make sure they are clean and dry.

First decorate the Caps; they will need time to dry.
I used Elemers Glue and Silver GLiTTeR.
Spread liberally, not drowningly, the Glue on the cap.
GLiTTeRiZe! 

You can also GLiTTeR the Acorn and leave the Cap natural
{I can't find my pics of those!}

Using a small drill bit {I used my Dremel} drill hole in Cap to insert hanger.

For the hanger, Sparkalicious PiPe Cleaners really rock,
as does the Green Wire.
Using any needle nose, flat nose, etc. pliers
to crinkle the Wire adds a really great accent.

Secure hanger with some Glue.
Place enough Glue to adhere to the Acorn and reattach the Cap.

Using a bowl of rice, or sand/dirt, beans
is great for setting the acorns up while they set up and dry.

Once the GLiTTeRed Acorns are completely dry,
hang on Tree, 
or any other surface
and Enjoy.

Sunday, November 27, 2011

Construction PaPer Chain


I really wanted to
keep it simple this year.
If I can avoid 
dragging all the stuff
from the attic out, 
hey, Gold Stars for me!


Here's a good old fashioned, from my childhood
and beyond, craft that was
* Easy
  * Cheap
* Fun

This is the first time my Wombers have done this craft.
And they had so much fun. 


Supplies:
----------
*Construction PaPer
*X~acto Knife or Razor
*Ruler {I used Metal so the blade wouldn't
           catch on the Wood}
*Glue {We used a Glue Gun}


I used an old cookie sheet 
for cutting the strips.
Line the paper 
up in a corner,
set your Ruler,
Slice.

I cut varied widths 
to make it 
more interesting.

They had a blast,
and we've gotten lots of 
compliments on the Garland.


sigh. I miss Kindergarten!


Thursday, June 30, 2011

Space Rock Crystals...

ok, not Space Rock, 
but definitely Crystals.
Sort of.

For Yulemas last year, 
the little Womb Wookies each received 
a Crystal growing kit.


Many moOns later, 
we broke open the box 
in our Secret Lab,
put on GoGGLes,
and proceeded to be 
Scientist on a miSSion 
{non!moOn}


Only the Yellow 
{which is appropriately this month's color} 
actually had success.


The Blue and Green, alas, were a flop. 
sort of. 
They tumbled.
The Womb Wookies had fun, 
that being the most important thing!

Next, we'll try Rocket's Rock Candy....edible too!

Friday, February 11, 2011

Easy Kids Valentine's Cards

 School Valentine's isn't what is was when I was a kid.
I remember going all out at school, with crafts, and a party.  
Elaborate boxes decorated to receive cards.
Now its, buy box, rip apart, put generic name signing {From: womb weeble}, bring to school.

I just made some simple ones for my daughter to bring to school.


Using card stock, 
a butterfly cutter, 
and sharpie pen,
I snapped them out.


Decide what size you want your card to be. This is pre~K so we went small.

Fold in half, crease well.

Stamp cut the butterfly on one side.


Using your sharpie, draw Hearts in the butterfly window.
Sign on the inside.
Tiniest bit of tape to hold together..

I stacked them all neatly and wrapped 
a strip of card stock paper around it to hold them together.
Viola.
Took less than an hour 


Monday, August 9, 2010

Manila PaPer and Crayons


With School starting in just two days, 
I am reminded of my favorite art supplies. 
Manilla paper and crayons.
The quintessential necessities for some groovy art work.  
The smell, the feel, the blank canvas and 64 choices of color...h
ow could a kitten could wrong? 

Pippi Longstocking's infamous bout with manila paper, where she declared it wasn't big enough and proceeded to draw on the floor. She's right, I don't think they could make a piece of manila paper that was big enough.

thank god for scotch tape.  

Creating structured pieces from the teachers instructions on the blackboard, 
to masterpieces that i was sure everyone would just be cracker jack over....

or putting rainbow sections of color down as a base, 
and then a cover of black to scratch out a picture.

Holidays ~ Where paper was colored and cut, glitterized and glued.

Yep you just can't go wrong with Manila paper and crayons.

Great stocking stuffers too!

Wednesday, July 14, 2010

sAND cANDLES

Beach Holiday.
Perfect for making Sand Candles.
So we did.
 
Supplies.
I already had the supplies at home, so it was as easy 
as packing them in a box.

Candle wax
Wick
Double boiler
Scissors
Sand
Herbs
 
We brought back a couple of buckets of sand from Le Beach.

 
Melt your wax first, after everything is set up.
I improvised a double boiler by placing a tin pie pan
over a pot of boiling water on med/low heat.
I was in no way thrilled to do it this way 
and would have preferred a better alternative,
but having worked with Wax, I made do.
 
Using The Womb Fruits beach toys, 
They made  the impressions in the sand
I cut the Wick to length and used a twisted piece of tin foil to
keep it up~right.

Make sure that the impression is deep but not touching the bottom 
of you container.
SLOWLY pour the heated wax into the mold.


After the Wax has cooled all the way through,
gently lift the candle out of the sand.
If it is still warm, let it cool completely.
Use a soft brush, like a paint brush, 
to clean it up and get rid of any loose sand.

For my Candles, I chose plain drinking glasses for the mold,
and dried herbs and fruit.
Bay leaves and Dried Orange Peel.

The instructions are the same until you add the herbs.

I would fill the mold about 1/3 of the way,
add my herbs, let cool enough to hold the herbs,
and then repeat until entire mold is filled.
If you fill the whole thing with Wax,
and then add your herbs, fruit, etc.
it will all sink to the bottom.
Especially the heavier pieces like Orange Peel.

Let cool all the way through and repeat the release process.


 I was really pleased with these!

 One problem I didn't see until after all was said and done,
was the Wobble Factor with the Sand Toy Candles.
Parts of the candle were higher than others 
resulting in Lean~age.
Haven't had a chance to find a corrections for that yet.

WARNING:
AS WITH ALL CANDLES, NEVER LEAVE BURNING UNATTENDED~
MOST ESPECIALLY THOSE WITH HERBS, FRUIT, FLOWERS, ETC.
THESE CAN TURN A ROMANTIC FLAME INTO A RAGING MASS OF FLAMING WAX.