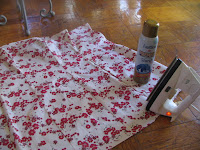

This is a weekend project.
I hate to throw
a pretty fabric away.
a pretty fabric away.
Majority of the time,
I never end up doing
I never end up doing
anything with them.
I "inherited" this table
{ok, more like I laid claim
to it when we were dating.}
{ok, more like I laid claim
to it when we were dating.}
These small side tables just appeal to me.
I just couldn't think of anyway to craft it up.
Then, an Idea.
Hey you got chocolate in my peanut butter...
Hey you got peanut butter on my chocolate.
and I wanted a Sunburst pattern.
That was the only way I could think of to get a smoother fit,
and to make the pattern interesting.
I took this old dress, and began de-dressing it.
Using an X~acto Knife {WITH FRESH BLADE}
I began ripping all the seams out.
After ripping the main seam and opening the Dress,
I did a quick starching to flatten it.
It made it a lot easier to rip the remaining seams. Using a template cut from illustration board, I traced as many of the shapes onto the back of the fabric that would fit.
 I had also lightly
sketched
sketched
on the board top.
You can google a
Sunburst pattern
to print
to print
if that helps.
Once I had all
my fabric strips cut,
I took the top
off the stand;
off the stand;
cleaned the stand,
and began placement of the fabric.
Setting up on the floor is your best bet. It gives you the room you need with the ease of moving from one spot to the next. Using your template or a REALLy good eye, iron as small a seam as you can; I went approx. 1/4 inch. I starched the hell out of them too. Be aware of the type of fabric you are using. This makes a difference. It worked for this.

Do a placement test of the fabric
before you start decoupaging.
Once I was happy with the placement,
I started with the longest strip and
decoupaged it. I went a little bit
heavier on the seams for a good fit.
Constantly and firmly using the brush
to smooth it down. Get your seams as
flush as you can.
It was very meditative.
I went back while it was drying
to smooth any seams, re~glue any loose ends/seams,
and to smooth down any fabric that bubbled up.
When that was completely dry, I used a box type razor {FRESH}
to very carefully trim the fabric where needed.
A fresh sharp blade cuts the glue stiffened fabric nicely.
I used a bowl to do a smooth edge for the Sun circle.
I liked my Sun off to the side.
I repeat the whole trim cutting and re~gluing
of the Sun circle edge. Cut my circle for the Sun,
Glued and trimmed it.

Once the fabric was completely dry, I painted the table edge with a soft, dark, metallic Copper acrylic paint.
 While the tabletop was drying,
 I cleaned up the stand,
and repainted it with
Krylon's Cherry Red.
Sweeet!! color.
When it was all dried and done,
I re~attached the pieces and here we are:
I at one point thought about pouring a layer of Resin
over the fabric, but decided against it for a few
reasons:
* Not sure of the yellowing factor of the resin
*Not sure of the dye factor of the fabric
*What if I get tired of it? If it's resinated,
I can't rip the fabric off.
I'm looking for a nice piece
of glass.


That came out great!
ReplyDeleteThat is so cool Kelly Ann! You have a great way of looking at things. I'm still looking at that damn artex on my walls!
ReplyDeleteGreat project, and a clever way to get a larger surface out of smaller pieces.
ReplyDelete{ Thank you, thank you, than you verra much!
ReplyDelete