Showing posts with label Gifts. Show all posts

Friday, December 18, 2015

That time of the year again!
Party Time!

Every year I try to think of new and different gifts
for Teachers, and Student's goody bags.
In addition to those, I'm the one who usually does the party crafts, 
which means a LOT of time
for creative thinking and gathering of the supplies.

As much as I love to BaKe,
I know the Teachers get overwhelmed with BaKeD goOdies, 
so I try to come up with something different.


What I started doing last year,
 was get them gift cards from one of 
our local coffee shops.
I put a $5 limit on it,
 enough for a medium to large drink,
or a small drink and a pastry.

Using my Silhouette, I cut out these pretties:


They are supposed to bend at both ends and pop open to make a small pillow,
but I don't know if it was the humidity
or the paper wasn't thick enough 
{even though I did use heavy cardstock}
they just wouldn't pop open,
so I ended up just folding them over like this:


This year's gOody Bags:


Many parents put candies or edible treats in the goOdy Bags,
which is why I go the Art route!
These kinds of crafts you can get
at Michael's and Hobby Lobby
in bulk bags 
and usually marked down.
And Don't Forget Your Coupon!
for those things that aren't.

Mini~BuBBLes and a homemade ornament
complete the ensemble.

Happiness in a plain brown paper bag!


Wednesday, May 23, 2012

Last DaY of ScHooL, Big BuDDy gifts and a little Something for the TeaCheRs

 Here we go again...SuMMeR.
 Temperature wise, it's BEEN SuMMeR.
Calendar wise, it's the end of the ScHooL year.


At our ScHooL, the Kindergarteners have a 5th grade Big BuDDy.
I really LoVe this concept.

As an end of the year celebratory gift,
I made this:


and this:


One of our FaVoRiTe! 5h grade TeaCheRs retired this year. Out of all the YuMMies I baked this year, the Apple Pecan CaKe from the William Sonoma book, was his favorite. Guess who got one big arse loaf of Apple Pecan CaKe for his gift? Yep; also a copy of the recipe!


It was an emotional last day, as my middle Womb Fruit will be moving on to MiDDLe SchooL next year. His K class was the first one for a few of the teachers
{we are lucky that our Daughter Fruit got the same k teacher}
so this was their first "graduating" class. Tearful indeed.


All in All, we are off to a great start of SuMMeR Vacation.

Sunday, February 13, 2011

Love is the air...

 {promo picture. I did not make these}

I have loved making my own 
Bath and Beauty stuff since I was in 
middle school.

Although I have not made these
well, I have made the Lavender Bath Salts,
these Bath Bombs have got my attention!

Mountain Rose is my No.1
place I go to for most of
my Herbal and Beauty needs.

Even though many are celebrating 
Valentine's day this month,
I share these as more of a 
Goddess Beauty Ritual,
performed on Friday,
which is ruled by Venus,
Goddess of Love.
What better way to show one's self Love
than to pamper it.


Sunday, January 9, 2011

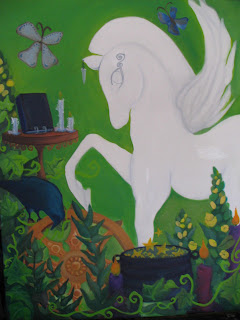
Casey's Altar ~ a Painting


 Prior! to Christmas, Hipstercrite asked Her bloggletts what they were giving for Gifts this year. In my confident and overzealous contribution I warbled "I'm doing a painting and I'm three strokes away from finishing it"....meh. Forhead thump.


Now it is done.
I finished it yesterday. 


My friend Casey, big happy Queen that he is, 
is quite dear to Me. 

He is particularly fond of a College Painting I did 
{see below,no, further.....further, there at the bottom}

In order to push my Self to progressing in my Craft, and getting a portfolio together, I came to the conclusion that doing a painting for Him would be perfect. And it was. This is one of those pieces that I really am happy with. Of course, every time I look at it, I see this I could have done, that I should have done, yada yada.

But I knew for certain that it was done; felt it. 

So know, two months after His Birthday, a month after Yulemas, He shall be the owner of this piece that was made especially for Him. We always have these Spiritual conversations, so it wasn't hard to ask Him the symbols of things that were meaningful or spiritual.
From His List, this is what I came up with.


These are details that are my favorites:


Biggest challenge was using all that Green.

My most favorite detail in the painting is the Crow.
Using a really deep Blue instead of Black
rendered a beautiful version of the bird.


I was glad for the challenge 
and pleased that I accomplished it.


onward I go to the next one.


 College Art Class Project

Monday, December 6, 2010

Wynter White Forest Tree

Wynter White Yulemas Tree


Here is a smaller version of the Wooden Tiered Tree,
and all in White.

This version came much
closer to my Vision,
than the first one, 
and had Me eager 
to make many more!


The Tree is 9 inches tall, and I started with 7 inch slats up to 2 inch.


Diamond Dust Glass GLiTTeR 
was applied very liberally,
I tried making the branches look like 
they had Sneaux piled on them.

Using Clear, Silver, and White Findings, 
I made an assortment of 
Ornaments and Decorations.
Candles also.


I placed small mirror glass tiles around the bottom for the Ice.


I really like the look of the plain wood against all that White.


I'm making a few more of these to give as gifts this year.


my poor candle light picture...fail!


Original Tiered Tree/Instructions

Thursday, May 20, 2010

Last Day of School, Gifts, and Summer Officially starts at 3:47 pm....


wow.
today is a bit overwhelming.
I'm a bit teary today, 
and that's something new.

It was great being so involved with my son's classroom and working with his teacher, Mr.L
Starting from last summer 
when we painted the mural in his classroom, 
to all the projects, 
and roommothering...
I find it sad that it is ending.

Mr. L texted me early this morning 
and asked me to come by the room, 
he had something for me.
We get there and 
he hands me this beautiful box from L'occitane1
THRILLS!

Inside were Two Rose soaps, 
a Rose Shimmering lotion, 
and a regular Lotion.
omg.

I LoVe Rose!
I LoVe anything Beauty related!
and
I LoVe ShiMMer.....

{Priscilla dabs her eyes; its just grand when someone shows they appreciate you by gifting you things that are totally them; it makes the gift doubly~bubbly}

There was also a gift card from all three 3rd grade teachers
for my favorite Coffee Shop, 
as a treat for helping with the Leap testing.

I feel so Appreciated!

so we begin our Summer....

Sunday, May 16, 2010

ChEEsy Tourist Gifts and Souvenirs

 I LOVE me some cheesy souvenirs,  
I most especially LoVe ashtrays.

Yeah, well, we all have our quirks.

 The LoVeLy little GLiTTeR bottle is from the Penn & Teller show.
Glamorized!

No, don't bring me a t shirt!
Damn it, bring Me an ashtray.

That whole retro feel,  
the glaring Vegas logo, 
and that nifty ass spring.

This is what I got all The Bigger Kids Who Claim to Be AD~ults.....
They loved them too.

They do SO much more than hold ciggy butts:
*they hold jewelry
*they hold coins
*they hold incense

yep, Ver~sah~tyle!


After The Chook Man, gathered up my fancy GLiTTeR bits, 
I stuffed them, dried beer and all, 
into this miniature Genie bottle for a Souvenir!

that way the Light sparkling off the GLiTTeR will match the sparkle in my Eye, as I fondle the bottle, and fondly recall that night.....

just call it Precious.


Yes, I LoVe Me some Cheesy Gifts and Souvenirs!

Monday, January 11, 2010

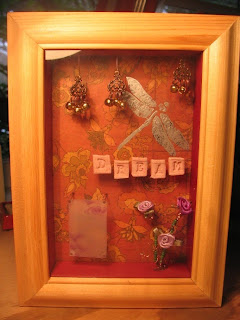
Kelly's Frontier Shadow Boxes

This is a Shadow Box that I made for a Friend. 
I had much Fun creating and putting this together. 
Unfortunately, I made it before I became a Bettie Blogger, 
so I only have completed photos.


Supplies:
*************
One picture frame Shadow Box {purchased mine from Hobby Lobby}
Decorative PaPer
Fimo clay {or any other type of clay}
Silver transfer in Dragonfly
Scrap Fabric
Jewelry findings
Bell Beads
Fabric Flowers ~ small
Small Seed beads
Alphabet RuBBer Stamps
Face Rubber Stamp
Wire {thin and medium gauge}
Acrylic Paint
Plastic sheeting, med to thick
Ink
Flat top Headpins
Mod Podge or other suitable Glue
Hot glue
X~Acto knife and a NEW Blade
Various small tools: Flat nose pliers, wire cutters, jewelry pliers


The fascinating thing about projects like this is that it can look complicated
because of all the details but actually its just putting things together.
The KEY to any project is to be ORGANIZED!
{same with cOOking}

The DREAM LeTTers
Take your Clay; roll out a slab, approx: 1/2 inch, a smidgen thinner. 
Use the Alphabet RuBBer Stamps to make your LeTTers.
Cut them out with the X~Acto Knife.
Bake in oven according to package directions.
Once cooled, use the Flat top Headpins for support. 
I cut mine to length first, and then glued the flat top to the back of the Letters.

The Shadow Box has a removable back.
Remove this and using the Decorative PaPer,
trace to size, cut, and adhere to the INSIDE of the removable back.
I used a piece of Scrap Fabric to cover the OUTSIDE. 
Set aside to dry.

The Shadow Box also had removable wooden sides on the inside.
I took those out and painted them.
I used a Magenta.
Set aside to dry.

Goddess Face
Place the Plastic Sheeting on a flat surface. 
Ink the Face Stamp generously but not overly;
too much Ink will make it slippery on the plastic surface.
I stamped the whole sheet and picked the best one.  
Cut carefully around the edge. 
Now, for the next step,
I used the Flat top Headpins as support for the Goddess Face.
Play around with this part, experiment with differnt types of support. 
For this particular piece I wanted the Goddess Face to look as if it was floating, 
so I had to find the piece that would look most Invisible. 
The Headpin was perfect: it was straight, strong, and had support.
Use the Flat top for surface support.
Set aside.

The Roses
Cut lengths of {medium} Wire, about, 8 inches.  
Use the 8 inch strip, push through the Fabric Flower,
and twist one length around the other, a few times, not all the way yet.
Cut lengths of {fine} Wire, about 8 to 10 inches. 
Use these for the Seed Beads 
for the stalks & leaves kind of thing.
Twist and Bead the Flowers to your design and like. 
You may even find a way that's easier for You.  
These are created to your tastes.

The Bell Clouds
I used Jewelry findings create these Bell Clouds. 
I don't have a clue what "official" shape that is,
but hey, a picture is worth a thousand words!
I used the {medium} Wire 
to create the hooks for the top of the Bell Cloud. 
Use the {thinner} Wire to attach the Bells.
I always have trouble getting a clean wire wrap but I do my best.

The Silver Dragonfly
Once the back piece is dry,
take the rub~on transfer sheet, 
cut your Dragonfly out, make placement, and then rub.
Lift gently.

Hanging the Clouds, Planting the Roses.
Get the Top and Bottom two pieces of the inside wood strips that you painted. 
I drilled a couple of very tiny tiny holes 
for placement of the Bell Clouds and The Roses.
Slip the ends of the Wires through the holes, 
and make any adjustments. 
Bend wire flat against wood 
and place a small {flattish} blog of Hot Glue to hold in place.
Let dry. 

Attaching the Goddess Face and DREAM LeTTers
Lay the back piece flat, and place pieces where you want them. 
Use your Glue Gun to attach the Headpins to the back piece. 
Let dry and gently test to make sure it is secured.

Putting it all Together.
Replace your Inside side pieces and then the back piece.
Mine were snug, but you can slowly and gently push them back in. 
Make any adjustments or changes { my flowers kept hitting the glass}
There ya go.

The possibilities are endless. 
Plus, these kinds of Projects are great for
using up Extras, Scraps, and all those LiTTLe Pieces that are to good to get rid of.