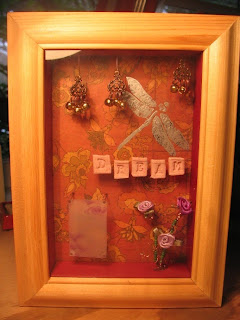
This is a Shadow Box that I made for a Friend.
I had much Fun creating and putting this together.
Unfortunately, I made it before I became a Bettie Blogger,
so I only have completed photos.
Supplies:
*************
One picture frame Shadow Box {purchased mine from Hobby Lobby}
Decorative PaPer
Fimo clay {or any other type of clay}
Silver transfer in Dragonfly
Scrap Fabric
Jewelry findings
Bell Beads
Fabric Flowers ~ small
Small Seed beads
Alphabet RuBBer Stamps
Face Rubber Stamp
Wire {thin and medium gauge}
Acrylic Paint
Plastic sheeting, med to thick
Ink
Flat top Headpins
Mod Podge or other suitable Glue
Hot glue
X~Acto knife and a NEW Blade
Various small tools: Flat nose pliers, wire cutters, jewelry pliers
The fascinating thing about projects like this is that it can look complicated
because of all the details but actually its just putting things together.
The KEY to any project is to be ORGANIZED!
{same with cOOking}
The DREAM LeTTers
Take your Clay; roll out a slab, approx: 1/2 inch, a smidgen thinner.
Use the Alphabet RuBBer Stamps to make your LeTTers.
Cut them out with the X~Acto Knife.
Bake in oven according to package directions.
Once cooled, use the Flat top Headpins for support.
I cut mine to length first, and then glued the flat top to the back of the Letters.
The Shadow Box has a removable back.
Remove this and using the Decorative PaPer,
trace to size, cut, and adhere to the INSIDE of the removable back.
I used a piece of Scrap Fabric to cover the OUTSIDE.
Set aside to dry.
The Shadow Box also had removable wooden sides on the inside.
I took those out and painted them.
I used a Magenta.
Set aside to dry.
Goddess Face
Place the Plastic Sheeting on a flat surface.
Ink the Face Stamp generously but not overly;
too much Ink will make it slippery on the plastic surface.
I stamped the whole sheet and picked the best one.
Cut carefully around the edge.
Now, for the next step,
I used the Flat top Headpins as support for the Goddess Face.
Play around with this part, experiment with differnt types of support.
For this particular piece I wanted the Goddess Face to look as if it was floating,
so I had to find the piece that would look most Invisible.
The Headpin was perfect: it was straight, strong, and had support.
Use the Flat top for surface support.
Set aside.
The Roses
Cut lengths of {medium} Wire, about, 8 inches.
Use the 8 inch strip, push through the Fabric Flower,
and twist one length around the other, a few times, not all the way yet.
Cut lengths of {fine} Wire, about 8 to 10 inches.
Use these for the Seed Beads
for the stalks & leaves kind of thing.
Twist and Bead the Flowers to your design and like.
You may even find a way that's easier for You.
These are created to your tastes.
The Bell Clouds
I used Jewelry findings create these Bell Clouds.
I don't have a clue what "official" shape that is,
but hey, a picture is worth a thousand words!
I used the {medium} Wire
to create the hooks for the top of the Bell Cloud.
Use the {thinner} Wire to attach the Bells.
I always have trouble getting a clean wire wrap but I do my best.
The Silver Dragonfly
Once the back piece is dry,
take the rub~on transfer sheet,
cut your Dragonfly out, make placement, and then rub.
Lift gently.
Hanging the Clouds, Planting the Roses.
Get the Top and Bottom two pieces of the inside wood strips that you painted.
I drilled a couple of very tiny tiny holes
for placement of the Bell Clouds and The Roses.
Slip the ends of the Wires through the holes,
and make any adjustments.
Bend wire flat against wood
and place a small {flattish} blog of Hot Glue to hold in place.
Let dry.
Attaching the Goddess Face and DREAM LeTTers
Lay the back piece flat, and place pieces where you want them.
Use your Glue Gun to attach the Headpins to the back piece.
Let dry and gently test to make sure it is secured.
Putting it all Together.
Replace your Inside side pieces and then the back piece.
Mine were snug, but you can slowly and gently push them back in.
Make any adjustments or changes { my flowers kept hitting the glass}
There ya go.
The possibilities are endless.
Plus, these kinds of Projects are great for
using up Extras, Scraps, and all those LiTTLe Pieces that are to good to get rid of.


No comments:
Post a Comment