Showing posts with label Ornaments. Show all posts

Saturday, February 25, 2012

PrisciLLa's EarThLy DeLights


 When it's LoVe,
it's LoVe!

{Priscilla says: sigh, I just LOVE Yulemas. Such pretty things}

Saturday, February 11, 2012

PrisciLLa's EarThLy DeLights

 I fell in LoVe with these cardboard GLiTTeR Bird ornaments
{Priscilla says: Everything is better with GLiTTeR, Sugar!
Who doesn't want to shine??}

This one is extra special ~ the head pops off
and you can stash a treat inside!


I'd like to get a Pink One, and a Blue One to compete a personal set.


If this Byrd could talk, oh the stories it might tell....


TinselandTrinkets

Wednesday, December 21, 2011

Styrofoam and PiPe Cleaner Bells.....

 
 I LOVE KINDERGARTEN!

 Party time in the fun house.


The K`kids were Super excited to find out
that with their Holiday party, they were
going to do an Art Project~

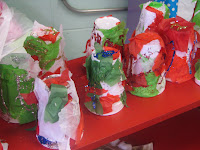
Styrofoam and PiPe Cleaner BeLLs....
WITH GLiTTeR!


We had the Kinder's tear pieces of Tissue PaPer up,
   and then glue them the Styrofoam Cup. 
If you do use GLiTTeR like we did, 
have the Kinder's decorate the cups with GLiTTeR
after placing the Tissue PaPer on. 
You want to give the glue some time to dry
before doing the next step.


While we waited for the cups to dry, we had the kids attach their BeLLs to the PiPe Cleaners. Slide the PiPe Cleaners through the loop on the BeLL and have them twist it.

You want a few inches twistability for two reasons:
1. To have enough to secure the BeLLs tightly
2. The Twist will be your anchor to keep the cup on 
   and still allow the BeLL to jingle.


Using a Pencil {hey teacher, I forgotmy Peeeencil!} 
punch a hole in the top of the cup to push the
PiPe Cleaner BeLL through, and Shazam! 
You've got a Styrofoam and Pipe Cleaner Bell!

Bring on the Ringers....

Thursday, December 15, 2011

Embroidery Felt Bird ornament


This project comes from the same art magazine
as the bread dough snowflakes.
My  level of my embroidery was pretty weak,
But I wanted it so I did it....


Trace the pattern on to your felt 
{you could easily substitute
any fabric i would imagine}
Follow the stitching instructions for the embroidery.
Now, the only thing I know about embroidery
is how to thread the needle.
Oy!


I eventually finished the stitching,
 then cut the pieces out along the outline.

I did not stuff mine..I tried, but it was not a pretty sight.

I used mine as a wreath ornament for the front door.
Using a large sprig from our Yulemas tree,
I attached the Felt Bird and hung up.
I really like this project
so plan on making more of these in the future.
Rainbow would be gorgeous.


 Instructions from Holiday Crafts 2010:

Tuesday, December 13, 2011

Vintage JeweLbrite AngeLs and BeLLs

I found these LoVeLies on Etsy.  
There are many reasons why I love these: 
*Childhood memories {mine is top left, that's Santa on the inside}
*They're Angels
and
*Plenty for each Kid to get one later on when they grow up.

Plus, I'm Bright & Shiny for anything in miniature~

I will be adding more pieces in the coming year.
It was Delightful to see so many different varieties.


MrFilthyRotten

Sunday, December 11, 2011

Annual NoLa Yulemas Tripp...cause it's a, family tradition

 Angeli's!!!
 Santa's Quarters

 Our FAVE~orite New Orleans Street Performer!

I FREAKIN LOVE NEW ORLEANS!

Friday, December 9, 2011

GLiTTeR PineCones


Continuing with the Ornament Creations
We gathered up some pine cones
Brought them home and then
"baked" them in the oven on 225
for a couple of hours because
they were wet and needed to be dried out,
which opens them back up.


DO NOT amp up the oven temp to try and hurry up the process,
for you shall haveth burnt smoking pine cones....


 Supplies:
----------------
*Pine Cones
*Glue
*GLiTTeR
*PiPe Cleaners or other hanging material
{we used Sparkalicious PiPe Cleaners,
but CoLoRfuL Yarn would work really well, too}

Once they are dried and opened up sufficiently,
all that's left is to twist the pipe cleaner to the top,
dribble glue on all sides.
Dribble,
Don't Drobble,
or you'll have great big blobs of sporadic GLiTTeR.

Shake pine cone firmly, but gently to 
remove excess glitter.
Set up to let dry.
Once it's dry 
add randomly to your tree for 
some extra sparkly goodness in the Yulemas spirit.

{it's looking more and more like I need a new camera!}


Friday, January 21, 2011

Resinated Animal Cracker Ornaments

This is another one of those projects 
that I stumbled upon from back in the 80s.
Only that project was using
clear fingernail polish to coat the cookies.
Did NOT work!


But I've always loved the idea of this.
and it's easy.
looks good
and can make a great gift too.

Supplies
********
Animal crackers
Wire or pre~made hooks
Elmer's Glue
Resin
Wax paper
Wire cutter
Pliers
Wooden stick, I used a chopstick,
or other suitable object to make a hanging rack
Disposable spoon
Extra Wire for dipper hooks

I like the idea of making my own hooks.
I choose a burgundy/purplish wire.
20 gauge.
Cut a piece of wire, then use the
pliers/needle nose to shape it.
You can see I did a square for the
attached part; loop for the hanging part.


Using your chopstick or other object construct your hanging/drying rack.
I have a double clip "third hand" that I placed the chopstick on. 
Anything will work as long as you make sure the rod doesn't roll.
Place drying rack on wax paper {or other suitable stuff like foil or glass} for your drip.

After creating your hOOks, use the Elmer's glue to attach them.
Let glue dry completely. If it comes off, redo it.

Quickly make some S shaped dipper hooks
{the metal bit that is on the loop end}
Attach one to each loop.

Mix up your resin, Make sure its in a cup deep enough to dip the cookie crackers.

I used a bit of wire in the hook to dip the cookies in the resin. 
Have a disposable spoon handy to pour the resin around the hook 
and coat the cookie thoroughly. 
TRY NOT TO GET RESIN ON HOOK LOOP!
Then you'll be stuck with your dipper wire attached to you hanging hook. 
Let it runoff for a handful of seconds and place on hanging rack.
Let dry for a day or two, then lather, rinse, repeat.  
Twice more.

I triple coated these babies. 
So it can take up to a week to get these done. 
You want to make sure that they are
completely hardened and dried 
so they won't stick to anything. 
sometimes they do anyway.
If so, Let them out in the open for a bit
and they should harden back up.

I also wanted to see how they would look
with the Priscilla Effect.
GLiTTeRized.
I used this monkey as my guinea pig since I screwed up the hook.
Honestly, I'm not sure. I will have to play around some more with it.

When they are completely done, 
you should be able to carefully repackage them in their original box,
or maybe create something out of an egg carton.


Monday, December 13, 2010

Bread Dough Tree & Star Garland

The Bread Dough Ornament fun continues.

I just LoVe these Trees!
Of course, the photos really are just a bummer.

Plus,
this Garland was very long
and I just couldn't find a complimentary spot 
to photog them in.


I used 4 different shades 
of Green for the design. 

These cracker thin 
Ornaments need careful handling, 
but are worth it.

A bonus is that 
I also came up with
about 2 or 3 
new and improved ways
to create these Babies~
using different materials and tools.

I think I may have just gone into the Holiday HoHo Ornament business!

Sunday, December 12, 2010

New Orleans, Family, & Santa's Quarters


We had our Family Road Tripp
to New Orleans today.
Unfortunately, the Wind bordered on completely miserable,
so the day tripp was shorter than I would have liked.

But we accomplished our main goal
which was to peruse and purchase
at Santa's Quarters. 


This year we had the addition of 
The Sugar Bomb's best friend.
Their Laughter, and girl chitter chatter was the icing on the cake.


The Decor was tops as usual. 
Unique and LoVeLy.


I Spy......


Oh the excitement and overload of so much
GLiTTeR
CoLoRs
Whymsicality

Decisions, Decisions, Decisions...... DECIDED!


 I picked these.
 The Sugar Bomb Babe picked this and the ballerina


 The Blu Man's Bumble,
and yes, we are a PFLAG Family!

The Bluebird we picked to give to Grammie.
*************


The plan was to finish up with a trip to
Cafe Du Monde for Beignets and Hot Chocolate.
Unfortunately New Orleans was stuffed to the gills with high school football championship games,  plus Saint's fans. The line out the door was to long to wait in with The Womb Weebles
so we saved the Beignet's for our local Coffee~shoppe.
and it was SO worth it!